The main window provides an editor area for viewing and interactively editing movie components.
Editing tracks:
When a track is selected, you can edit
it by selecting Project/Edit Track from the menu bar.
Removing tracks:
When a track is selected, you can remove
it by selecting Project/Remove Track from the menu bar.
The Visible Rectangle:
A dashed rectangle will be displayed on
top of the editor area. This is to represent the area that will be
visible in the final movie. It is mostly meant as a visual aid, since
there is nothing to stop you from working outside of this rectangle.
Shifting the View:
When a component is not being edited,
the view display can be shifted by holding down CTRL and clicking and dragging
with the mouse. This will allow you to see components that may be
outside of the viewing area. You can center the viewing area by selecting
Project/Center from the menu bar.
Changing Settings:
By selecting Project/Settings from
the menu bar, you can change properties of the movie. Note that none
of the Settings parameters can be animated:
Width: Width of the visible rectangleHeight: Height of the visible rectangle
Background Color: Color the background is cleared to.
Anti Aliased: Check if shapes and text should be drawn anti aliased. Anti aliasing gets rid of the jagged edges of shapes.
Transparent Background: This is an advanced feature meant for people incorporating Gazelle movies into Java applications. It determines if the background should be cleared. If checked, the background will not be cleared and the application is responsible for drawing what lies behind the movie component, which will result in a transparent effect. Most movies will want to leave this option unchecked.
Frames/Second: The number of frames per second this movie displays when played. This can also be set through the Player Window.
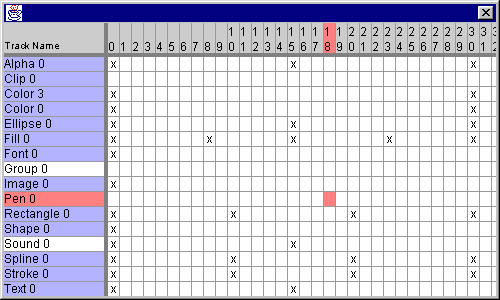
The track window provides a quick way to see all the tracks in your movie and their position in time. It provides the ability to move, edit and delete tracks and keyframes.
To open the track window, select Windows / Track Window from the menu bar.

The track window has four sections:
Upper Left: Track NameGeneral:
Lower Left: Track List
Upper Right: Frame Bar
Lower Right: Key Chart
The Frame Bar displays the current frame. A pink highlight indicates the current frame.
The Key Chart displays the keys, with an 'x' indicating the presence of a key at a given frame.
By clicking in the Track List, Frame Bar or Key Chart panes, you can change the current track and/or frame. Changes will be shown right away in the Main Window.
Editing Tracks:
Right clicking on a track in the Track
List will open a pop-up window with the following options:
Edit: Begin editing this trackToggle Visible: Switch this track between visible and invisible.
Rename: Change the name of this track. This can also be done through the Edit option.
Remove: Delete this track.
Move Up: Move this track higher in the edit window. Higher tracks are drawn after lower ones, so they will appear on top.
Move Down: Move this track lower in the edit window.
Editing Keys:
Right clicking in the Key Chart on an
empty cell will bring up a pop-up menu with one option: Insert.
Selecting this option will insert a new frame into the movie at this point.
Right clicking in the Key Chart on a cell
with an 'x' will bring up the key editor menu:
Edit: Begin editing the track at this keyMove: Change the frame this key occurs in.
Remove: Delete this key
Interpolation: Determines how keys blend with each other. If set to linear, this frame will blend into the next using linear steps. Constant will display this frame as is until the next frame. Cubic will give you a smooth blend with slow change near the start and end and rapid change in the middle.
Shifting the View:
You can change the sizes of the parts
of the pane by placing the mouse on either of the thick grey bars separating
the panes, clicking and dragging.
If you click and drag in the Track Name
pane or if you press CTRL and click and drag in any of the other panes,
you can change what section of the track/frame chart is visible.
For example, doing this in the Frame Bar will allow you to scroll down
to the frames beyond the visible area of the window.
The player window allows you to play your animation.

Buttons:
<<: Rewind to the first frameControls:<: Play animation in reverse
||: Stop animation
>: Play
>>: Advance to last frame
First: The number of the first frame of the animation. Must be 0 or greater.Current: The current frame in the animation
Last: The last frame of animation
Frames/Sec: How many frames occur per second. If more frames per second need to be displayed than the computer is able to render, extra frames will be skipped.
Loop: If checked, the animation will loop when it comes to the end.
Slider: A visual representation of the current location in the animation.
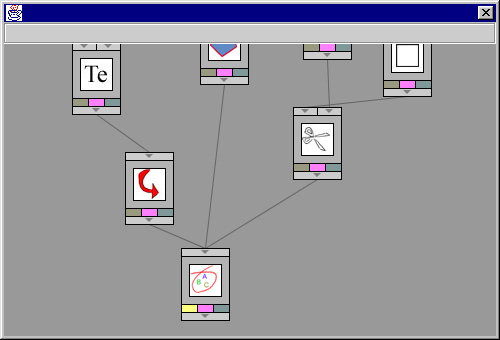
The flow window allows you to link tracks together. Some tracks rely on the inputs of other tracks, and the flow window allows you to organize this.

When you create a new track, an thumbnail representing the track will appear in the flow window. The graphic in the middle of the thumbnail describes the type of track being represented (a pair of scissors for a 'clip' track, a pentagon for a 'shape' track, etc.) The lines between thumbnails describe which flow into which. The colored boxes are flags which modify the behaviors of tracks.
Moving About:
When you create a new track, it's thumbnail
will appear in the flow window.
By clicking in the middle of the thumbnail and dragging it, you can change it's position within the flow window.
Moving the mouse over top of a track will display a message with the track's name and type. Moving the mouse over the arrows on the top of the track will display a message describing what types of tracks that input will accept.
Clicking and dragging on the blank area of the flow window will create a selection rectangle that will allow you to select groups of tracks to move about. Holding CTRL while dragging this rectangle will add new tracks to the group of tracks already selected. Holding ALT will subtract tracks from the ones currently selected.
Clicking and dragging while SHIFT is held will shift the visible area of the flow window itself. You can use this to see tracks that may be off screen.
Making Connections:
The point of the flow window is to create
relationships between tracks. For example, a text track needs two
inputs - a font track to define the font of the text and a color track
to define it's color. Most tracks have input defaults. For
example, if no color track was provided for the text track, it would color
it's text black.
Relationships are made by creating lines between the arrow at the bottom of the source track (it's output) and the arrows at the top of the destination track (the input). To create a relationship, click on the bar continuing the bottom arrow of your source track. The bar will turn red to show it's selected. Now click on the top arrow of the track you want to feed it into. The red bar will revert to grey and a line will be drawn to indicate the new relationship.
Some tracks will accept more than one type of track for a given input. A shape track will accept a spline, rectangle or ellipse for it's first input. An alpha track will accept anything at all for it's input. Mouse over the input arrow to get a list of what tracks are acceptable inputs.
Any track can have as many output connections as it wants. However, with the exception of the Group track, track inputs can only have one source. If you attempt to connect more than one output into an input slot, the old input will be replaced with a new one. Simply clicking on an input slot will remove it's input if one exists.
Flags:
All tracks have three flags:
Visible (yellow): This determines if the track is visible and is the same as the 'toggle visible' option available in the Track Window. Note that this only determines if this track itself is visible and does not affect how tracks which take it's input are displayed. For example, if you have an image track which feeds into a transform track and the image track has it's visible flag off, you will still be able to see the image because the transform track which it feeds into is visible. It is a good idea to have as many visible flags turned off as possible as each visible track takes time to draw in the movie. Ideally, only one track in a project will be visible which would be the flag of a final Group track that every other track feeds into.Editable (pink): This flag is not used. It was originally meant to modify the edibility of the track, and may be used in future versions.
Interrupted (blue): If this is on, it prevents the output of this track from flowing into the next. This effectively breaks the relationship between this track and the tracks it flows into without having to destroy the connections. This makes it easier to see the effect this track is having on it's children.
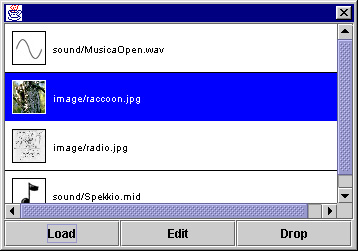
The resource window organizes the image, sound and MIDI files that can be incorporated into your Gazelle movie.

Because resources are external to Gazelle itself, they have to be handled specially. When a Gazelle project file is first created, /image and /sound subdirectories are created in the same directory as the project to hold the resources. It is the copies in these subdirectories that Gazelle subsequently deals with.
Buttons:
Load: Adds a new resource to the project. A dialog box will appear asking you to select a resource to add to the project. You can select any valid image (jpg, gif, png), sound (wav, au, aiff) or MIDI file (midi, mid) located anywhere on your hard drive. A copy of this resource will be made and placed into either the /image or /sound subdirectory. A corresponding entry will also appear in the resource window. Note: some operating systems allow people to put unusual characters such as spaces in file names. Since such names interfere with other computers which may try to view your movie later, files containing such characters will have a different name when cached.Edit: Change the name of a resource. Does not affect the file name.
Drop: Removes the resource from the project. Does not delete it from the /image or /sound directories, since there may be other projects still using this resource. You may have to go through these directories by hand and remove unwanted resources.